Dynamics 365 Bitesize Content – Expense Management
Find out how your employees can review and post expense claims more efficiently with Expense Management in Business Central.
As companies operate in increasingly flexible ways, with remote working and working from home, it becomes more important that they can review and post expense claims in an efficient way.
For employees, having a system that will track expenses, and allow them to take copies of receipts and invoices for later submission, is one less issue to worry about!
Expense Management in Dynamics 365 Business Central
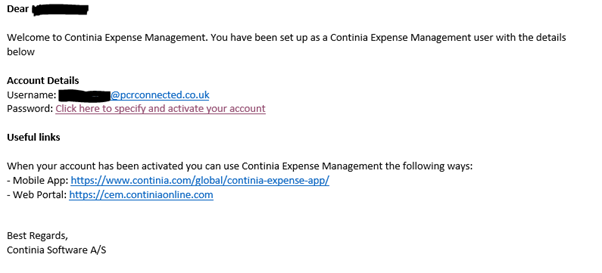
Expense Management for Dynamics 365 Business Central allows users to submits expenses, either mileage claims, or expenses that can be reclaimed. These can be logged either via an app (iOS or Android), and follow a defined authorisation path. Logging into Continia Expenses You need to be set up on the system and have received a welcome email. Once you have been set up on the system, you should receive an email confirming the set up, and requesting you set up an account, with a secure password. Please do not use your standard Windows Password.
Within the email, is a link next to password, click on the link to specify a password and activate your account. This needs to be only done once. There is also a link to the WebPortal, this should be book marked, and can be used to submit expenses. Alternatively there is a mobile app that can be used, once you have set your account up. This should be fairly self explanatory, this guide only covers the web portal. To Add an Expense, you will first need to create a claim (we call these Settlements) – this is similar to completing an expense form, where all expenses are included on the same form. Expenses, and Mileages are added to the one settlement, then submitted in one go. Logging an expense claim We will log an expense claim via the web portal initially, the steps are the same using the app. Log into the portal, click Settlement, and if you do not already have an open settlement, click New Settlement.
1. Create a Settlement for the claim to be submitted:
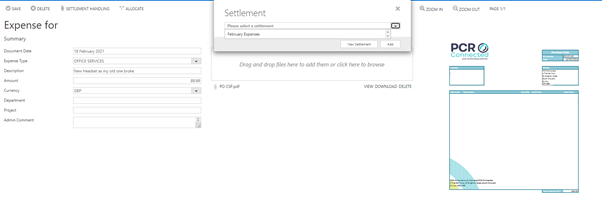
2. Add an expense Item, from the menu item at the top:
3. Complete the fields, drop downs are available
4. You can also drag and drop a file or image of the receipt. Please ensure all supporting documentation is included. A thumbnail of the document is included once uploaded. Expenses with no supporting documentation will be rejected. 5. Once the expense is added, it can be attached to the settlement, select settlement handling, and a drop down box allowing you to allocate to the settlement, or add new. Once attached, click save on the expense item. 
Mileage claims can be added in a similar way. Submitting a Settlement Once your expenses and mileage claims have all been added to the settlement: 
Open the settlement, and click submit.
It will them no longer appear in the list of open settlements, but will appear if you select the history option. This will now be forwarded for approval, then payment via BACS, you will receive remittance once paid.
Benefits of using Expense Management in Dynamics 365
See the main benefits of using expense management in Business Central below:
- Efficient way to handle the expense process – and effortless registering in Business Central
- Seamless authorisations processes make it easy for manager to approve expenses
- Paperless, and records are stored against the transactions
- Employees have a quick and convenient way to log expenses as they go – meaning no more lost receipts, or a selection in the car sun visor!
- Flexible and cost effective licensing Options
If you found this content useful, why not access more Dynamics 365 Bitesize Content?
- Consolidating financial data in Business Central
- Intercompany Transactions
- Purchase Invoice Automation with Continia
- Multi-Currency in Business Central
- Expense Management
For more information on Dynamics 365 Business Central, simply give us a call on 020 8681 0000 or view our How To Guides.


